
Main Courses
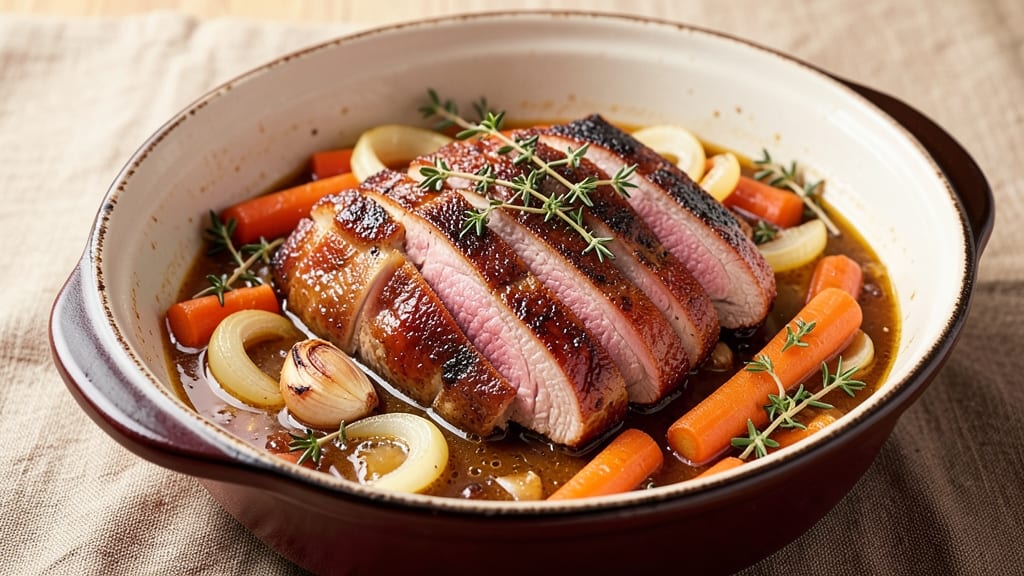
This apple cider braised pork recipe transforms tough pork shoulder into melt-in-your-mouth perfection with just one pot and a few hours of hands-off time. 💛 As someone who's spent years perfecting pork in Charleston's heat, I can tell you this method delivers restaurant-quality results without the fuss.
The secret lies in slow cooking the pork with apple cider, spices, and aromatics until it practically falls apart - creating a dish that's rich, aromatic, and packed with autumnal flavor.
The process begins with searing the pork to lock in juices, then deglazing the pan to build flavor. Apple cider becomes the star here - its natural sweetness and acidity tenderize the meat while infusing it with depth.
I like to use a mix of spices including cinnamon, cloves, and bay leaves, which complement the cider beautifully. The braising time varies depending on your cut, but plan for about 2.5 to 3 hours at low heat for the best results.
What you'll end up with is a dish that's equally impressive served at a holiday table or a weeknight dinner. The pork becomes so tender it practically shreds with a fork, while the apple cider reduction clings to each bite, offering a perfect balance of sweet and savory.
The aromas alone will have everyone gathering around your table - this is comfort food at its finest, with just the right amount of sophistication.
Serve it alongside mashed potatoes, crusty bread, or over polenta to soak up every last bit of that flavorful braising liquid. The leftovers actually taste better the next day as the flavors continue to meld.
This is the kind of dish that gets better with time - perfect for meal prepping or making ahead for gatherings. Let's get cooking!
Ingredients for apple cider braised pork
Six ingredients transform tough pork into melt-in-your-mouth perfection with apple cider's sweet depth.
| Ingredient | Amount | Notes |
|---|---|---|
| Pork Shoulder 🐷 | 4 lb | Bone-in for best flavor |
| Apple Cider 🍎 | 2 cups | Unfiltered for depth of flavor |
| Yellow Onion 🧅 | 1 whole | Sliced into half-moons |
| Carrots 🥕 | 4 medium | Whole, peeled, cut into chunks |
| Garlic Cloves 🧄 | 6 cloves | Crushed for aromatic release |
| Fresh Thyme 🌿 | ½ ounce | Or 1 tbsp dried thyme |
| Ground Cinnamon 🌶️ | 1 tsp | For warm autumnal flavor |
| Ground Cloves 🌶️ | ½ tsp | Use sparingly for depth |
| Bay Leaves 🍃 | 2 whole | Remove before serving |
| Olive Oil 🫒 | 2 tbsp | For searing pork |
| Kosher Salt 🧂 | 1 ½ tbsp | Divided for seasoning |
| Black Peppercorns 🌶️ | 1 tsp | Freshly ground preferred |
| All-Purpose Flour 🌾 | 2 tbsp | For dredging pork |
The pork shoulder is non-negotiable—look for a cut with good marbling for juiciness. Costco or Harris Teeter in Charleston carry excellent bone-in options. If you can't find unfiltered apple cider, Mott's or Tree Top work in a pinch, but the real stuff makes all the difference. That said, don't stress if you can't find it—any good-quality cider will do. The carrots and onions? Baby carrots and sweet onions from the store's pre-cut section save time without sacrificing flavor. Just make sure the carrots are firm and the onions have no dark spots.
No fresh thyme? Dried works at one-third the amount—just crush it between your fingers first. Running low on cloves? Allspice berries ground to a powder mimic that warm depth. The flour is just for dredging the pork before searing—skip it if you're short, but trust me on the extra step. For the spices, Penzeys Spices has the best quality, but the regular grocery store stuff is fine if it's fresh. If you're feeling fancy, add a pinch of nutmeg to the spice mix—it's subtle but adds another layer of warmth.
This dish gets better with time—plan to braise it for 2.5-3 hours on low heat. The pork will practically fall apart, and the apple cider will reduce into a glossy, flavorful sauce. Store leftovers in an airtight container for up to 5 days—they reheat beautifully. For meal prep, portion the pork and sauce separately so you can reheat just what you need. The sauce freezes well too, so make extra if you're hosting. Just thaw it overnight in the fridge before reheating.
Why You'll Love This Recipe
- One-Pot Magic: I swear by this recipe when I’m too tired to wash pots. Toss everything—pork, onions, carrots, cider—in a heavy pot, let it simmer, and walk away. The pork practically falls apart on its own, and the cider smell alone makes the kitchen feel like autumn.
- Sweet-Savory Balance: That first bite? Crispy edges on tender meat, with the cider’s tang cutting through the richness. The onions caramelize into something deep and sticky, while the garlic cloves melt into the pork like a secret hug. (Yes, even my garlic-averse husband asks for seconds.)
- Leftovers That Beg: This dish tastes better the next day—seriously. The flavors meld into something heartier, and reheating it is just about dumping it back in the pot. I’ve turned it into sandwiches, tacos, or just eaten it straight from the fridge with a fork. (No judgment here.)
- Budget-Friendly Feast: Pork shoulder is cheap, and a bottle of apple cider stretches across multiple meals. Honestly, I’ve made this for game nights, potlucks, and lazy Sundays, and it never feels like I’m sacrificing flavor for savings. Plus, the carrots add color—because presentation matters, even if it’s just for me.
Step-by-step instructions for apple cider braised pork
Here's how to transform tough pork shoulder into melt-in-your-mouth perfection with fragrant apple cider and warm spices.
🔥 Step 1: Sear the Pork Shoulder for Deep Flavor
Pat the 4 lb pork shoulder completely dry with paper towels—this ensures a crispy crust. Heat 2 tbsp olive oil in a large Dutch oven over medium-high heat until shimmering. Place the pork in the pot, fat-side down, and sear undisturbed for 8-10 minutes until deeply browned on all sides.
I press down gently on the pork during the first minute to prevent curling and ensure even contact with the pan. Flip carefully using tongs and sear the other sides until golden brown. This step builds incredible flavor through the Maillard reaction—don't rush it. Once browned, remove the pork and set it aside on a plate.
🍳 Step 2: Build the Aromatic Base
In the same Dutch oven, add the 1 whole yellow onion sliced into half-moons and 4 medium carrots cut into chunks. Cook for 5 minutes until softened and slightly caramelized. Add the 6 cloves garlic cloves and cook for 30 seconds until fragrant—don't let the garlic burn.
Sprinkle in the 1 tsp ground cinnamon, 0.5 tsp ground cloves, 1.5 tbsp kosher salt, and 1 tsp black peppercorns. Stir for 1 minute until the spices release their aromatic oils. This warm spice blend is what gives this dish its signature autumnal depth.
🥘 Step 3: Dredge and Brown the Pork
In a shallow bowl, combine the 2 tbsp all-purpose flour with 1 tbsp kosher salt and ½ tsp black peppercorns. Coat the pork shoulder thoroughly, pressing the flour mixture into all the crevices. Return the pork to the Dutch oven and sear for 2-3 minutes per side until golden brown again.
This final searing step creates a protective crust that locks in juices during the long braise. The flour also helps thicken the apple cider sauce later. Remove the pork again and set it aside on a plate, leaving all that delicious browned flour behind in the pot.
🍎 Step 4: Braise in Apple Cider Until Tender
Pour in the 2 cups apple cider and scrape up any browned bits from the bottom of the pot with a wooden spoon. Add the 0.5 ounce fresh thyme and 2 whole bay leaves. Return the pork to the pot, spooning some of the cider over the top to help it cook evenly.
Bring the liquid to a simmer, then reduce heat to low and cover. Braise for 3 hours, turning the pork occasionally to ensure even cooking. The pork is done when it's fork-tender and the juices run clear when pierced with a knife. The sauce should be rich and slightly reduced.
⏰ Step 5: Rest and Serve with Pan Sauce
Transfer the pork to a cutting board and tent loosely with foil. Let it rest for 15-20 minutes before slicing. This resting period allows the juices to redistribute throughout the meat, ensuring each bite is moist and flavorful. Skim any excess fat from the braising liquid if desired.
Slice the pork against the grain into ¼-inch thick slices and serve with the pan sauce spooned over the top. The result should be tender, juicy pork with a beautifully balanced sauce that's sweet from the apple cider and warm from the spices. Perfect for serving with crusty bread or over mashed potatoes.
Pro Tips For Making Apple Cider Braised Pork
- Brown the Pork First: Don’t skip the sear—get that pork shoulder golden in a hot Dutch oven with a splash of oil before adding anything else. I used to rush this, and the final dish always tasted flat; that crust locks in flavor and keeps the meat from turning mushy.
- Use Whole Spices, Not Powder: Toss in 2-3 whole star anise or a bay leaf with the apple cider—no need to grind them. After burning through three batches of ground spices (which burn too fast), I realized whole spices infuse flavor steadily without bitterness.
- Deglaze with Cold Cider: After browning the pork, let the pan cool slightly, then pour in cold apple cider instead of hot. The sudden temperature drop pulls more flavor out of the fond without boiling off the alcohol too quickly—trust me, it makes a real difference.
- Cut Carrots in Chunks: Skip the dice—thick, uneven slices (about ½-inch) stay intact longer and soak up the cider’s sweetness better. Thin pieces turn to mush, and you’ll end up with a watery braise instead of rich, caramelized bites.
Essential equipment for this dish
Dutch Oven Essentials
A heavy-duty Dutch oven is non-negotiable for this recipe—I swear by my Lodge 5.5-quart cast iron with lid. The thick walls maintain even heat distribution during the long braise, while the tight-fitting lid traps steam to tenderize the pork perfectly.
If you don’t own one, a Le Creuset stoneware Dutch oven works beautifully too, though it’s heavier. For budget options, Amazon Basics or Farberware stainless steel models handle the job, though they may require slightly lower heat settings. 🔥
Precision Thermometer
Invest in a meat thermometer with a probe—my ThermoWorks Smoke is my go-to for monitoring both the braising liquid and pork’s internal temperature. The pork should reach 203°F for fall-apart tenderness. A Thermoworks Thin Probe works too if you prefer something more compact.
Never guess with pork—overcooking turns it dry, and undercooking leaves it chewy. I check the temperature every 30 minutes after the first hour to ensure perfect doneness.
Tongs and Wooden Spoon
Use heat-resistant silicone or stainless steel tongs (I prefer OXO Good Grips) to flip the pork without piercing it, which would let precious juices escape.
A wooden spoon (like Lodge’s 12-inch model) is essential for deglazing the pan and scraping up those flavorful browned bits—metal spoons can scratch your Dutch oven’s seasoning. I keep a second spoon nearby to stir the braising liquid without disturbing the pork.
Cutting Board and Knife
A sharp chef’s knife (I use a Victorinox 8-inch) and a large cutting board (my John Boos walnut board) are critical for prepping onions, carrots, and slicing the finished pork. For the pork shoulder, a boning knife helps separate meat from bone cleanly if you’re serving bone-in.
I always slice against the grain for maximum tenderness—¼-inch thick slices are ideal. A sharpener (like Work Sharp) keeps your knife in top form for clean cuts.
Measuring Tools
Precision matters with spices and liquids. Use a spice scale (like OXO Good Grips) for accurate measurements of cinnamon, cloves, and thyme—these spices make or break the dish. For liquids, a liquid measuring cup (I love Pyrex’s 2-cup version) ensures you add exactly 2 cups apple cider.
A kitchen scale (like Escali Primo) is a game-changer for weighing pork and spices, especially if you’re scaling the recipe up or down. Don’t eyeball it—this dish relies on balance.
Storage Containers
For leftovers, use glass airtight containers (like Pyrex 4-cup bowls) to store the pork and sauce separately. Glass preserves flavors better than plastic and reheats evenly in the microwave. I portion the pork into 1-cup servings and the sauce into ½-cup portions for easy reheating.
Label containers with dates—this dish keeps for up to 5 days in the fridge or 3 months in the freezer. For freezing, use quart-sized freezer bags with 1-inch headspace to prevent freezer burn. ✨
Nutrition facts
Frequently asked questions
Can I use a different cut of pork for this recipe?
While pork shoulder is ideal, you can substitute with pork butt or pork picnic roast—they're essentially the same cut. For a quicker version, try pork tenderloin (reduce braising time to 1.5 hours), but it won't be as tender. Avoid lean cuts like loin chops—they lack fat for moisture. Bone-in cuts add flavor but require longer cooking.
What if I don't have apple cider? Can I substitute?
Yes! Use unfiltered apple juice (like Odwalla) or a mix of ½ cup apple juice + ½ cup chicken broth. For depth, add 1 tsp apple cider vinegar to mimic the acidity. Avoid filtered cider—it lacks the sediment that adds complexity. If using juice, braise 15 minutes longer to reduce the liquid properly.
How do I make this dish ahead of time?
Cook the pork completely, then let it cool. Store in an airtight container with the braising liquid for up to 5 days in the fridge. Reheat on low heat with a splash of water to restore moisture. For freezing, portion the pork and sauce separately—freeze for 3 months. Thaw overnight in the fridge before reheating. The flavors actually improve after resting!
Why does my pork turn out dry?
Overcooking is the #1 cause! Use a meat thermometer—pork should reach 203°F (not 212°F). If using a slow cooker, cook on low for 8 hours (not high). Another tip: Don't skip the resting time—juices redistribute during those 15-20 minutes. For extra moisture, add ¼ cup beef broth during braising.
Can I make this in an Instant Pot?
Sear the pork first, then add all ingredients except bay leaves. Cook on high pressure for 60 minutes, then quick-release. Remove pork, shred slightly, and return to pot with sauce. Cook on sauté mode for 5 minutes to thicken. The Instant Pot version cooks 3x faster but requires 10 minutes extra resting time for juices to settle.