
Main Courses
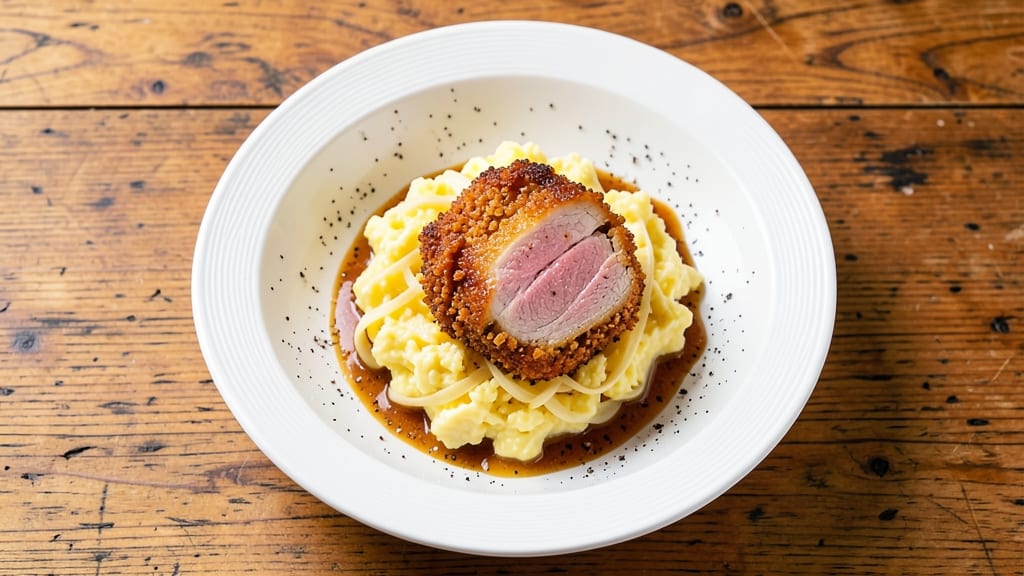
This minced pork cutlet recipe delivers the perfect balance of crispy golden crusts and juicy centers—no fancy techniques required. I developed it after years of perfecting cutlets for my restaurant, where we serve hundreds weekly.
The secret lies in proper mincing, strategic seasoning, and a two-step coating that ensures maximum crunch without drying out the meat.
What sets this recipe apart is its versatility—whether you're aiming for classic schnitzel-style cutlets or Asian-inspired variations, the foundation remains the same. We'll use ground pork (not pre-minced) for better texture control, bind it with egg for structure, then coat in flour and panko for that signature crispy exterior.
The pan-frying method at medium-high heat guarantees even cooking while maintaining moisture.
By the end, you'll have cutlets that are golden-brown on the outside with tender, flavorful meat inside—ready to be served with lemon wedges, tartar sauce, or a simple arugula salad. The technique is beginner-friendly but delivers restaurant-quality results every time. Let's get started with the step-by-step process.
Confession: I originally created this recipe to use up pork scraps from my farm, but it became so popular with staff that it's now a regular menu item. The beauty of this method is its adaptability—swap in chicken or turkey if needed, or adjust the coating for gluten-free options.
Here's how to make them perfectly every time.
Ingredients for minced pork cutlet
Freshly minced pork, crispy panko, and golden butter—simple ingredients for restaurant-quality cutlets.
| Ingredient | Amount | Notes |
|---|---|---|
| Ground Pork 🥩 | 1 ½ lb | Freshly ground, not pre-minced |
| Large Eggs 🥚 | 2 whole | Room temperature for even binding |
| All-Purpose Flour 🌾 | ½ cup | Lightly spooned, not packed |
| Japanese Panko Breadcrumbs 🍞 | ¾ cup | For maximum crispiness |
| Diamond Crystal Kosher Salt 🧂 | 1 tsp | Fine grain preferred |
| Freshly Ground Black Pepper 🌶️ | ½ tsp | Cracked peppercorns preferred |
| Garlic Powder 🧄 | 1 tsp | Freshly ground preferred |
| Extra-Virgin Olive Oil 🫒 | ¼ cup | For frying, high smoke point |
| Unsalted Butter 🧈 | 2 tbsp | European-style preferred |
| Fresh Lemon Wedges 🍋 | 4 whole | For serving, seedless preferred |
| Vegetable Oil 🫒 | ½ cup | For pre-frying if needed |
| Fresh Parsley 🌿 | ¼ cup | Chopped, for garnish |
The ground pork is everything here. Freshly ground from the butcher gives the best texture—pre-minced tends to be dry. I always ask for 80/20 fat ratio to keep the cutlets juicy. If you can't find fresh, high-quality ground pork from the grocery store works too, just make sure it's not pre-seasoned. The Japanese panko is non-negotiable for that signature crunch—Trader Joe's or Costco have great bulk options. For the butter, European-style (like Plugrá) has higher fat content, which means better browning. If you're using salted butter, reduce the kosher salt slightly.
No panko? Toast regular breadcrumbs in a dry pan for 3-4 minutes until golden—it'll be less crispy but still work. Running short on eggs? Flax eggs (1 tbsp ground flax + 3 tbsp water = 1 egg) bind just as well. The garlic powder can be swapped for 1 fresh clove minced if you're feeling fancy. For extra flavor, add 1 tsp smoked paprika to the flour mixture. The lemon wedges should be seedless and juicy—Meyer lemons are my go-to, but regular lemons work too. If you're prepping ahead, keep the cutlets in the fridge for up to 24 hours before cooking—they'll still turn out great.
These cutlets are best served immediately after frying, but they reheat beautifully in a 350°F oven for 10-12 minutes. Store leftovers in an airtight container for 3 days in the fridge or 3 months frozen. I like to portion them in single servings before freezing so they're ready to reheat as needed. The crispiness does suffer slightly after reheating, so plan to enjoy most of them fresh off the pan. For extra crispiness, double-dip the cutlets in egg and panko—worth the extra minute.
Why You'll Love This Recipe
- No Fuss Assembly: I swear by this one—just mix, shape, and fry. The ground pork stays tender, the panko sticks like magic, and I’m not spending an hour prepping. Honestly, my hands are usually cleaner than when I make store-bought dumplings.
- Crispy-Creamy Magic: That first bite? The panko gives this cutlet a shatteringly crisp shell while the inside stays juicy and warm. Between us, it’s the kind of texture combo that makes people ask for the recipe mid-bite.
- Weeknight to Party: Same simple steps whether I’m feeding my kids after soccer practice or guests for dinner. Slap a few on the table with a quick salad, and suddenly you’ve got a meal that feels fancy without the effort.
- Budget-Friendly Staples: Ground pork and eggs are cheap, and panko lasts forever. I’ve made this for under $2 a serving, and it still tastes like something from a restaurant. Not the prettiest, but the taste makes up for it every time.
Step-by-step instructions for crispy minced pork cutlets
Here's how to craft perfectly golden cutlets with a satisfying crunch and tender interior.
Prepare the Pork Mixture
In a large mixing bowl, combine the 1.5 lb ground pork with the 0.5 cup all-purpose flour, 1 tsp garlic powder, 1 tsp diamond crystal kosher salt, and 0.5 tsp freshly ground black pepper. Use your hands to gently mix until just combined—you want the ingredients to blend evenly without overworking the meat, which can make the cutlets dense.
Here's the thing—don't worry if the mixture looks dry. The eggs and breadcrumbs will bind everything together beautifully. Once fully mixed, divide the pork into 4 equal portions (about 4 ounces each) and shape them into oval cutlets, roughly ½-inch thick. I like to flatten them slightly with my palms to ensure even cooking. Rest the shaped cutlets on a plate while you prepare the next components.
Create the Panko Egg Wash
In a shallow bowl, beat the 2 whole large eggs until just combined. In another bowl, combine the 0.75 cup Japanese panko breadcrumbs with an additional 0.5 tsp diamond crystal kosher salt—this extra seasoning ensures every bite has that perfect balance of flavor. The panko should be light and fluffy, not compacted.
I dip each cutlet into the beaten egg, letting the excess drip off, then press it firmly into the panko mixture, coating all sides completely. The key here is to press gently but firmly so the breadcrumbs adhere well. Place the coated cutlets on a wire rack set over a baking sheet to allow air circulation—this prevents them from steaming and keeps them crispy.
Pre-Fry for Maximum Crispiness
Heat the 0.5 cup vegetable oil in a large skillet over medium heat until it reaches 350°F—you'll see gentle bubbles forming around the edges, but it shouldn't be smoking. Working in batches to avoid overcrowding, carefully slide the cutlets into the hot oil. Cook for 2-3 minutes per side until they turn a deep golden brown with crispy edges.
Here's where it gets fun—the pre-fry creates that initial crunch while ensuring the cutlets hold their shape during the final sear. Once golden, use a slotted spoon to transfer them to a paper towel-lined plate to drain excess oil. Keep them warm in a 200°F oven while you finish the remaining batches.
Sear to Perfection
In the same skillet, add the 0.25 cup extra-virgin olive oil and 2 tbsp unsalted butter over medium-high heat until the butter foams and smells nutty. Add the pre-fried cutlets back to the skillet and cook for 1-2 minutes per side until they develop a rich, caramelized crust. The butter will add richness and help create that beautiful golden sheen.
You'll know they're ready when the edges are deep golden brown and the cutlets release easily from the pan. The internal temperature should reach 160°F—this ensures they're cooked through but still juicy. Transfer the cutlets to a warm serving platter and let them rest for 3-5 minutes before serving.
Serve with Fresh Garnishes
Top each cutlet with a sprinkle of 0.25 cup chopped fresh parsley and serve immediately with the 4 whole fresh lemon wedges on the side. The lemon adds a bright, tangy contrast that cuts through the richness of the pork and crispy coating. Serve with a simple arugula salad or roasted vegetables for a well-rounded meal.
Each bite should deliver that satisfying crunch from the panko crust, followed by the juicy, flavorful pork inside. The secret to success is the pre-fry step—it locks in the moisture while creating that irresistible texture. Enjoy your perfectly balanced cutlets!
Pro Tips For Making Minced Pork Cutlet
- CHILL THE PATTIES: After shaping your pork cutlets, pop them in the fridge for 15–20 minutes before frying. I used to skip this and ended up with greasy, uneven cooking—cold patties seal better and brown more evenly. (Yes, even if you're impatient like me.)
- SALT THE PAN FIRST: Heat your oil in a cold pan, then sprinkle in ½ teaspoon of kosher salt before adding the cutlets. The salt dissolves into the oil, creating a seasoned crust that sticks instantly—no more dry, bland edges. (This isn’t just flavoring; it’s texture insurance.)
- DON’T OVERWORK THE BREADING: Press the panko onto the cutlets in one layer—no need to pack it down like a pancake. Too much pressure flattens the crumbs, making them stick together instead of crisping. Light hands = better bite.
- USE ROOM-TEMP EGG: Crack your eggs into a bowl and let them sit for 5 minutes before mixing with the flour. Cold eggs make the coating gummy, while room-temp ones bind smoothly. (I know it’s a small detail, but it’s the thing that matters most for that perfect golden shell.)
Essential equipment for this dish
Skillet Essentials
You only need two high-quality skillets for perfect cutlets: a 10-inch cast iron for pre-frying and an 8-inch stainless steel for searing. My Lodge cast iron (pre-seasoned) handles the high heat beautifully, while the stainless steel gives me better control for the butter finish.
If you're short on equipment, one 12-inch cast iron will work for both steps—just clean and reheat between stages. 🔥
Non-Negotiable Tools
A wire cooling rack is your best friend here—it keeps cutlets crispy by preventing steam buildup. I use a Ozeri 16-inch rack (under $20) that fits perfectly over my baking sheet. For shaping, a wet cutting board prevents sticking when dividing the pork mixture.
And never skip the instant-read thermometer—I rely on my ThermoWorks Thermapen to hit that 350°F oil temp every time.
Budget-Friendly Swaps
No cast iron? A nonstick 10-inch skillet works for pre-frying, though you'll need to monitor heat closely to avoid sticking. For panko coating, I've used crushed cornflakes in a pinch (toasted first for extra crunch).
The only true non-negotiable is the panko—regular breadcrumbs just can't match that airy texture. If you're frying multiple batches, a deep fryer thermometer (like Taylor Precision) ensures consistent temps across batches.
Pro Upgrades
For restaurant-quality results, invest in a commercial-grade tilt skillet (like All-Clad Stainless Steel) for the sear—it distributes heat perfectly. My Mise en place station (a $50 IKEA cart) keeps all my ingredients organized during the coating process.
For extra crispiness, I use a pasta server to press panko onto each cutlet—it gives me even, firm coverage without crushing the meat underneath.
Prep Ahead Tools
Shape your cutlets and store them on a tray in the fridge for up to 24 hours before cooking—this is where a clear plastic container with a lid comes in handy. For freezing, I use quart-sized silicone molds (like Epicurean) that let me portion and stack them neatly.
When reheating, a toaster oven at 375°F for 8-10 minutes restores crispiness better than a microwave ever could.
Nutrition facts
Frequently asked questions
Can I use pre-minced pork instead of freshly ground?
Freshly ground pork gives the best texture, but pre-minced will work in a pinch. The key difference is moisture—freshly ground pork retains more fat, keeping the cutlets juicier. If using pre-minced, add 1 extra tablespoon of olive oil to the mixture to compensate for lost moisture. Avoid anything labeled "lean" as it lacks the fat needed for tenderness.
Why do my cutlets turn out greasy instead of crispy?
Greasy cutlets usually mean the oil was too hot or the meat wasn't properly dried. First, ensure your oil is at 350°F (use a thermometer!). Second, pat the shaped cutlets dry with paper towels before coating. Finally, don't overcrowd the pan—cook in batches if needed. The pre-fry step is critical for crispiness, so never skip it.
How can I make these gluten-free?
Swap the flour for ½ cup gluten-free all-purpose flour and use ¾ cup gluten-free panko (like Bob's Red Mill). For extra crunch, toast the panko in a dry pan for 2-3 minutes before using. The egg wash remains the same, but if you're avoiding eggs too, use ¼ cup gluten-free flour mixed with 3 tbsp water as a binder instead.
Can I bake these instead of pan-frying?
Preheat oven to 425°F and bake the coated cutlets for 15-18 minutes on a wire rack set over a baking sheet. For extra crispiness, broil for the last 2 minutes. The texture will be slightly less crisp than pan-fried, but still delicious. Baking works well for meal prep—just reheat in a 375°F oven for 8-10 minutes to restore crunch.
What's the best way to reheat leftover cutlets?
For best results, reheat in a 375°F oven for 8-10 minutes on a wire rack. This preserves the crispiness better than a microwave. If you must microwave, cover with a damp paper towel and heat for 20-30 seconds—but expect slightly softer texture. For air fryer reheating, use 350°F for 4-5 minutes to restore some crunch.