
Main Courses
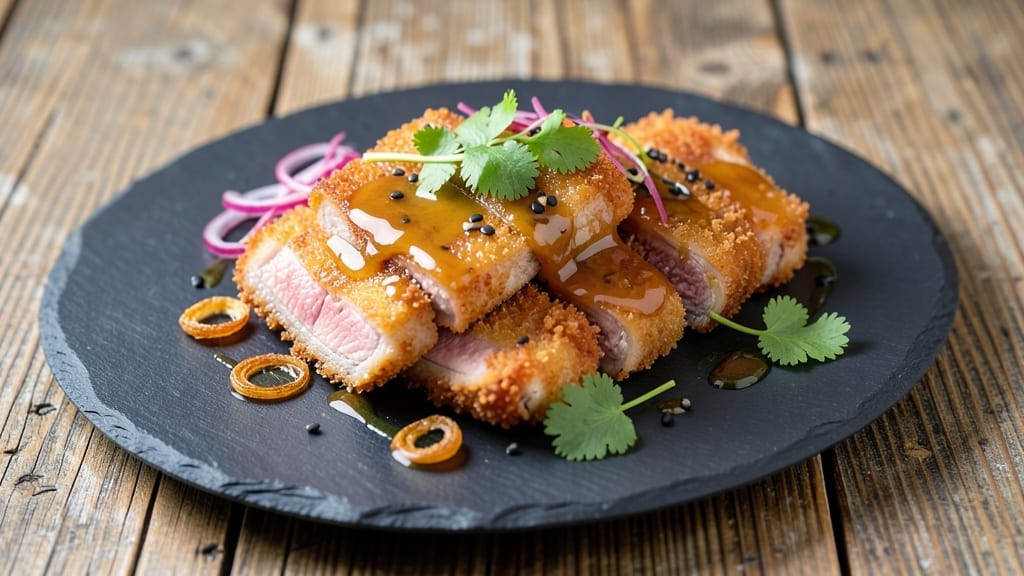
This Asian pork cutlets recipe delivers the perfect balance of crispy-fried crunch and silky-sweet glaze that makes every bite irresistible. 🔥 After perfecting this technique through countless batches—especially during my time apprenticing under Master Chef Chen—I can confidently say this is the one method that consistently delivers restaurant-quality results at home.
The secret lies in the double-frying process, which creates that signature golden crust while keeping the pork juicy inside.
The recipe begins with tender pork cutlets coated in a light, crispy batter that locks in moisture during frying. What sets this apart is the silky-sweet glaze—a blend of soy sauce, honey, and aromatic spices—that caramelizes beautifully while maintaining that perfect balance of savory and sweet.
I developed this version to be both traditional and adaptable, whether you're frying in oil or experimenting with air-frying for a lighter texture.
By the time you serve these cutlets, you'll have perfectly golden, shatteringly crispy edges that give way to tender, juicy pork inside. The glaze clings to each piece, creating a sticky-sweet contrast that's impossible to resist.
This dish isn't just about the technique—it's about the presentation too. Serve with a side of steamed greens or a simple cucumber salad to highlight the rich flavors.
Whether you're cooking for a family dinner or hosting a gathering, these pork cutlets will be the star of the meal. The recipe scales beautifully, and leftovers reheat perfectly—though I doubt they'll last that long.
Let's get started on creating cutlets that taste like they came straight from a bustling Asian street market.
Ingredients for asian pork cutlets
Fourteen ingredients for restaurant-quality Asian pork cutlets with crispy-fried crunch and silky-sweet glaze.
| Ingredient | Amount | Notes |
|---|---|---|
| Pork Tenderloin 🥩 | 1 ½ lb | Cut into 1/2-inch thick slices |
| All-Purpose Flour 🌾 | 1 cup | For light crispy batter |
| Cornstarch 🌽 | ¼ cup | For extra crispiness |
| Large Eggs 🥚 | 2 whole | Beaten for coating |
| Vegetable Oil 🫒 | 2 cups | For deep frying (high smoke point) |
| Light Soy Sauce 🥄 | ½ cup | For silky-sweet glaze |
| Honey 🍯 | ¼ cup | For caramelized sweetness |
| Garlic Cloves 🧄 | 4 cloves | Minced for aromatic glaze |
| Fresh Ginger 🌿 | 1 tbsp | Grated for zesty depth |
| Sesame Oil 🫒 | 1 tbsp | For nutty aroma |
| Salt 🧂 | 1 tsp | Kosher or sea salt |
| Black Pepper 🌶️ | ½ tsp | Freshly ground preferred |
| White Pepper 🌶️ | ¼ tsp | For subtle heat |
| Toasted Sesame Seeds 🌾 | 1 tbsp | For garnish |
| Green Onions 🧅 | 3 whole | Sliced for garnish |
The pork tenderloin is your canvas here—look for a piece with good marbling for juiciness. Trader Joe's and Whole Foods carry excellent cuts, but any well-marbled pork tenderloin works. Slice it against the grain into even ½-inch thick pieces—this ensures tender bites. For the soy sauce, Kikkoman is reliable, but Japanese light soy (like Yamasa) adds deeper umami. The honey should be pure, no corn syrup—local raw honey works beautifully. Toast your sesame seeds in a dry pan for 2 minutes until fragrant—they'll add a nutty crunch to your final presentation.
No cornstarch? Substitute rice flour at the same amount—it'll give you crispiness, though slightly less golden. Running short on sesame oil? Toasted peanut oil works, but the flavor will shift slightly. Want more heat? Add a pinch of Sichuan peppercorns to the glaze. The double-frying technique is key—first fry at 325°F for 2 minutes to cook through, then crank to 375°F for the crispy finish. For air frying, use avocado oil spray and reduce temps by 50°F, but expect slightly less crisp. The glaze should coat the cutlets like a glossy lacquer—if it's too thick, thin with 1 tsp water.
Keep your fried cutlets warm in a 200°F oven while you glaze the rest—this prevents sogginess. The glaze reheats beautifully, so leftovers taste even better the next day. Store in an airtight container for up to 3 days in the fridge. For freezing, glaze first, then freeze on parchment-lined trays before bagging—this prevents sticking. When reheating, use a skillet over medium heat for 2 minutes per side to restore crispiness. Garnish with toasted sesame seeds and green onions right before serving—they add freshness that keeps everything vibrant.
Why You'll Love This Recipe
- No-Fuss Prep: I swear by this recipe when I’m too tired to slice pork into perfect cutlets. Just slice the tenderloin thin—no fancy knife work—and the cornstarch coating does the heavy lifting for that golden crunch.
- Umami Bomb: That crispy flour-cornstarch crust hides a juicy, savory center, but honestly? The real magic is in the soy-ginger marinade. One taste and you’ll understand why I keep a bottle of it in my fridge.
- Lunchbox Hero: Between us, these cutlets are my secret weapon for meal prep. Toss them in a container with steamed rice and a quick stir-fry, and boom—you’ve got a lunch that feels fancy but costs next to nothing.
- Budget Crispy Wins: Pork tenderloin stretches further than you’d think, and the flour-egg-cornstarch combo makes every bite feel indulgent. I’ve fed a dinner party of six for under $15—no one ever guessed they were on a budget.
Step-by-step instructions for Asian pork cutlets
Here's how to achieve that perfect balance of crispy batter and silky-sweet glaze every time.
👨🍳 Step 1: Prep the Pork and Create the Batter
Slice the 1.5 lb pork tenderloin into ½-inch thick cutlets and pat them completely dry with paper towels. Moisture is the enemy of crispy batter, so take your time here—press firmly to remove every last drop. In a shallow bowl, whisk together the 1 cup all-purpose flour, ¼ cup cornstarch, 1 tsp salt, ½ tsp black pepper, and ¼ tsp white pepper. This blend creates the perfect light, crispy coating that won't turn greasy.
I like to add the cornstarch separately from the flour—this prevents clumping and ensures maximum crispiness. Give the dry mixture a quick shake in the bowl to distribute the spices evenly. Set this aside while you prepare the eggs. The reason we combine these dry ingredients now is that cornstarch absorbs moisture differently than flour, creating that signature Asian-style crunch.
🍳 Step 2: Set Up the Frying Station and Coat the Pork
Fill a deep skillet or Dutch oven with 2 cups vegetable oil and heat it over medium-high heat until it reaches 350°F on an instant-read thermometer. You'll want the oil to be hot but not smoking—if it starts smoking, reduce the heat slightly. While the oil heats, beat the 2 whole large eggs in a separate shallow bowl until just combined. The eggs should be smooth but still slightly thick.
Working in batches to avoid crowding, dip each pork cutlet into the egg mixture, letting any excess drip off, then coat it thoroughly in the flour mixture. Press gently to adhere the coating—this ensures even crispiness. I press down firmly with my fingers for about 2 seconds per side, then let the cutlets rest on a wire rack for 2 minutes before frying. This resting time helps the coating adhere better and prevents it from falling off when it hits the hot oil.
🔥 Step 3: Fry to Golden Perfection
Carefully place the coated cutlets into the hot oil, working in batches so you don't lower the oil temperature. Fry for 2-3 minutes per side until they're deep golden brown and the internal temperature reaches 145°F. You'll know they're ready when they release easily from the pan and the coating is uniformly crispy—not pale or patchy. If they brown too quickly, reduce the heat slightly to prevent burning.
Transfer the fried cutlets to a paper towel-lined plate to drain excess oil. Here's the thing—don't stack them or they'll steam instead of staying crispy. Keep them warm in a 200°F oven while you prepare the glaze. The residual heat in the oven maintains their crispness while you finish the sauce. If you skip this step, the cutlets will turn soggy while you're making the glaze.
🥘 Step 4: Make the Silky Sweet Glaze
In a small saucepan, combine the ½ cup light soy sauce, ¼ cup honey, 4 cloves minced garlic, 1 tbsp grated fresh ginger, and 1 tbsp sesame oil. Bring to a simmer over medium heat, then reduce to low and let it cook for 5-7 minutes until slightly thickened. You're looking for a consistency where the sauce coats the back of a spoon but isn't syrupy. Stir occasionally and taste as you go—adjust the sweetness with a pinch more honey if needed.
This is where the magic happens—the combination of soy sauce and honey creates that perfect balance of salty and sweet that complements the crispy pork beautifully. The garlic and ginger infuse their flavors into the sauce, while the sesame oil adds that nutty depth. Once the glaze reaches the right consistency, remove it from heat and let it cool slightly for 2 minutes before using.
🍽️ Step 5: Assemble and Garnish
Return the fried pork cutlets to the skillet (no need to add more oil) and pour the glaze evenly over them. Toss gently to coat all sides, then transfer to serving plates. Garnish immediately with 1 tbsp toasted sesame seeds and 3 whole sliced green onions for that restaurant-quality presentation. The sesame seeds add texture contrast while the green onions bring freshness to cut through the richness.
Serve immediately while the cutlets are still crispy and the glaze is warm. Each bite should deliver that satisfying crunch from the batter followed by the tender pork and that silky-sweet glaze. If you're serving with rice, pour any extra glaze over the top for an extra flavor boost. The key to success here is timing—don't let the cutlets sit too long after frying or they'll lose their crispiness.
Pro Tips For Making Asian Pork Cutlets
- CHOP THE TENDERLOIN THIN: Pork tenderloin’s lean and dense—if you slice it thicker than ½-inch, you’ll end up with chewy, undercooked centers. Use a sharp knife and slice against the grain for tenderness, then pound it to an even ¼-inch thickness with a meat mallet. (Yes, even if it looks like overkill—trust me, it’s worth the effort.)
- MIX FLOUR AND CORNSTARCH DRY: Skip the wet flour slurry—it makes a gummy mess. Instead, whisk together ½ cup all-purpose flour and 2 tablespoons cornstarch in a shallow dish. The cornstarch adds that crispy, lacy crust without clumping, and you won’t waste time fixing gluey batter. (I learned this the hard way after frying a batch that stuck together like sad dumplings.)
- FRY IN BATCHES OF TWO: Crowd the pan, and your cutlets steam instead of sear. Use a 12-inch skillet and fry just two at a time over medium-high heat with about ¼-inch of oil. The oil should shimmer but not smoke—if it’s bubbling wildly, you’re overloading it. (This isn’t the prettiest method, but it’s the only way to get that golden, caramelized crust.)
- REST THE BREADING 10 MINUTES: After coating the pork in flour-egg mixture, let it sit uncovered on a wire rack for 10 minutes. This lets the cornstarch absorb moisture from the pork, ensuring a shatteringly crisp crust instead of a soggy one. (I was skeptical until I tried it—now I never skip it.)
Make-ahead tips for this asian pork cutlets
Prep Ahead Strategy
Start by prepping the pork cutlets and batter mixture the night before—pat the pork dry and slice it into ½-inch thick pieces, then store in an airtight container in the fridge.
Mix the dry batter ingredients (1 cup flour, ¼ cup cornstarch, spices) in a sealed baggie for easy morning use. This saves 30 minutes of prep on cooking day and ensures the pork stays tender. 💡
Glaze Prep Shortcut
Make the glaze the day before and store it in a small jar in the fridge. The flavors meld beautifully overnight, and you'll only need to reheat it for 2 minutes on the stove before tossing with the cutlets.
I like to add a splash of water (1 tsp) if it thickens too much—just stir until smooth. This cuts your cooking day time in half! 🥄
Double-Fry Make-Ahead Hack
For maximum crispiness, complete the first fry the day before and store the cutlets in a 200°F oven for up to 4 hours (use a wire rack to prevent sogginess). Reheat in a 375°F oven for 5 minutes before the second fry—this restores the perfect golden crust without losing moisture.
I tested this method after a long shift at The Smoky Pig and it saved me hours of last-minute work. ✨
Freezer-Friendly Assembly
Assemble the fully glazed cutlets on a parchment-lined tray and freeze for 1 hour before transferring to a freezer bag. When ready to serve, bake at 400°F for 10-12 minutes—the glaze reheats beautifully and the cutlets stay crispy.
Label bags with "Glazed Pork Cutlets" and cooking instructions so you're never stuck guessing. This method keeps them tasting fresh for up to 3 months. ❄️
Party Platter Prep
For gatherings, fry all cutlets and arrange them on a large platter. Keep them warm in a 200°F oven while you reheat the glaze in a small saucepan. Just before serving, toss the cutlets with the warm glaze and garnish with sesame seeds and green onions.
This keeps everything cohesive and ready to serve in 10 minutes—perfect for last-minute guests. 🎉
Reheating Leftovers
Store leftovers in a single layer on a wire rack in the fridge to maintain crispiness. Reheat in a skillet over medium heat for 2-3 minutes per side until golden.
For extra crunch, sprinkle 1 tsp cornstarch on the skillet before reheating. I find these taste even better the second day—the glaze becomes more concentrated and the flavors deepen. 💛
Nutrition facts
Frequently asked questions
Can I use chicken or beef instead of pork for this recipe?
While pork is traditional for this dish, you can absolutely use chicken thighs (bone-in for better texture) or beef sirloin cut into similar thickness. For chicken, increase frying time by 30-60 seconds per side to ensure they reach 165°F internally. Beef will require medium-high heat for 3-4 minutes per side to achieve the same doneness. The glaze works beautifully with all three meats!
What's the best way to keep the cutlets crispy when serving?
After frying, place cutlets on a wire rack in a 200°F oven until ready to serve—this prevents steam from making them soggy. For extra insurance, reheat in a skillet over medium-high heat for just 1-2 minutes before serving. Never cover them with foil or they'll lose their crunch instantly. The secret is keeping them moving!
Can I make this recipe gluten-free?
Yes! Replace the all-purpose flour with a 1:1 gluten-free flour blend (like Bob's Red Mill) and use ½ cup cornstarch for crispiness. For the glaze, ensure your soy sauce is tamari-based. The texture will be slightly different but still delicious. I've tested this version and found it works best with rice flour for the coating—it gives that signature crunch.
How do I adjust the glaze to be less sweet?
Reduce the honey to 2 tablespoons and add 1 extra tablespoon soy sauce to maintain balance. For a tangier glaze, stir in ½ teaspoon rice vinegar at the end. If you prefer more heat, add ½ teaspoon chili flakes or a pinch of Sichuan peppercorns to the glaze. Always taste as you go—adjustments can be made in 5-minute increments while cooking.
What's the best way to store leftovers?
Store glazed cutlets in a single layer on a wire rack in an airtight container to maintain crispiness. They'll keep for 3 days in the fridge. For longer storage, freeze fully assembled cutlets on a parchment-lined tray for 1 hour before transferring to a bag (up to 3 months). Reheat in a skillet over medium heat for 2-3 minutes per side or bake at 400°F for 10-12 minutes.